If these errors are occuring while running the .asp pages then below is the fix that will make things working for you.

1. Error as displayed in the browser: The server failed to load application. Check Eventlog for more details.

2. System log in the eventvwr - W3SVC: The server failed to load application '/LM/W3SVC/1/ROOT'. The error was 'Class not registered'.


3. Event Viewer Application Log for MSDTC CLIENT
Event Type: Error
Event Source: MSDTC Client
Event Category: (10)
Event ID: 4427
Description:
Failed to initialize the needed name objects. Error Specifics: d:\comxp_sp3\com\com1x\dtc\dtc\msdtcprx\src\dtcinit.cpp:215, Pid: 2536
No Callstack,
CmdLine: C:\WINDOWS\System32\dllhost.exe /Processid:{xxxx}

4. Component Services -> COM+ in MMC, it will throw error.

This means that COM+ on your system is corrupted and it is not able to communicate with msdtc. Also it is not able to get to the IIS Components/Packages in your COM+.

Solution
1. Fix MSDTC:

a. Go to the command prompt
b. Change directory to C:\%windir%\system32
c. Type: msdtc -uninstall
d. Restart PC
e. Go to the command prompt
f. Change directory to C:\%windir%\system32
g. Type: msdtc -install

2. After, msdtc is installed (Component Services -> COM+ in MMC will not throw any errors). Delete and re-register IIS Components/Packages in the COM+ by following the below steps:

IIS related package in Component Services MMC
1. IIS In-Process Applications
2. IIS Out-of-Process Pooled Applications
3. IIS Utilities

Steps
a. In the Command Prompt, go to %windir%\system32\inetsrv folder
and run >rundll32 wamreg.dll, CreateIISPackage command

b. run >regsvr32 asptxn.dll

c. Then reset IIS using iisreset command, then re-open Component Services MMC to verfiy the IIS Components/Packages are recreated.

The above steps should make your .asp pages render properly!!!!!

Detect Windows service status .Net

Posted by Techie Cocktail | 1:39 PM | , , | 0 comments »

Good article to detect the status of a windows service using a ServiceController class in .Net - Detect Windows Service Status

ASP.Net Configuration

Posted by Techie Cocktail | 10:14 AM | , | 0 comments »

Configuration settings has got its own importance in asp.net. It stores various settings for a lot of programming areas in asp.net. Some of them being, storing connection strings, page-level trace settings, httphandlers, httpmodules, authentication & authorization settings and a lot more.

Its hard to remember all of these settings and their attributes. The below link is a good for reference link that covers most of the configuration settings:

http://msdn.microsoft.com/en-us/library/b5ysx397(VS.71).aspx

Databinding Expressions

Posted by Techie Cocktail | 12:15 AM | | 0 comments »

Databinding is one of the most important aspect in ASP.Net. Databinding, and one does not think about using Eval and Bind methods, not possible. Mostly you will find these methods used in .aspx page, and within <%# and %> delimiters.

Both retrieve values from the data-bound fields underneath the data-bound controls and renders them to the html page within your data-bound controls. In addition to just retrieving the value from database field, the Bind method can also submit your changes back into the database. This is the main difference between Eval & Bind methods.

Eval is also called as read-only (select - database operation) method, and Bind is called as Read/Write (select, update, insert, delete - database operations) databinder method.

Get more details at MSDN explained very nicely.

Recover deleted emails in Outlook

Posted by Techie Cocktail | 11:47 PM | | 0 comments »

Do not worry if you have deleted your emails using Del or Shift+Del (permanent delete) in outlook because it provides an option to recover deleted emails.

Go to Tools -> Recover Deleted Items which pops open a dialog where you can select the mails to recover.

Optimize SQL Using SET ROWCOUNT

Posted by Techie Cocktail | 2:19 PM | | 5 comments »

SET ROWCOUNT causes SQL Server to stop processing the query after the specified number of rows are returned.

Once the ROWCOUNT is set then the following queries would return those many number of rows in the resultset irrespective of any filtering or conditions applied.

To turn off this option, set the ROWCOUNT to 0. This command can be executed by any
users. The user need not have any special permissions to execute this command.


Syntax:
SET ROWCOUNT <number> | <@number_var>

It is the best way to optimize a query, if we are aware of how many records we would
need at a time. For example, if you are performing custom paging for GridView in
asp.net 2.0, then you can set the query to return only the required number of rows as set in the PageSize property of the GridView.

Visit MSDN for more details with examples: MSDN

Introduction to Microsoft Office 2010

Posted by Techie Cocktail | 12:36 PM | | 1 comments »

Chris Bryant introduces the new Microsoft Office 2010. Checkout the video for more details.

News - 07.31.2009

Posted by Techie Cocktail | 9:55 AM | , | 0 comments »

Look out for any USA jobs by visiting our job site at - USA Jobs.

Displaying culture specific date formats

Posted by Techie Cocktail | 6:20 PM | , | 0 comments »

Different countries use different date formats. Hard-coding different date formats in a multi-lingual application is definitely a bad choice. To display the date in the date format as used for a country, .net has ToShortDateString() function.

ToShortDateString() is culture-sensitive and outputs the date which is specific to the current culture set. Below example shows its use.


class Program
{
static void Main(string[] args)
{
//get the current culture and display its date format.
DateTime _date = DateTime.Now;
CultureInfo _currentCulture = Thread.CurrentThread.CurrentCulture;
Console.WriteLine("Current Culture: {0}: ", _currentCulture.Name);
Console.WriteLine(_date.ToShortDateString());

//set the current culture to french & display the french date format
Thread.CurrentThread.CurrentCulture = new CultureInfo("fr-FR");
Console.WriteLine("French Culture: {0}", _date.ToShortDateString());

//set the current culture to italian & display the italian date format
Thread.CurrentThread.CurrentCulture = new CultureInfo("it-IT");
Console.WriteLine("Italian Culture: {0}", _date.ToShortDateString());

//set the current culture to german & display the german date format
Thread.CurrentThread.CurrentCulture = new CultureInfo("de-DE");
Console.WriteLine("German Culture: {0}", _date.ToShortDateString());

//set the current culture to spanish and display the spanish date format
Thread.CurrentThread.CurrentCulture = new CultureInfo("es-ES");
Console.WriteLine("Spanish Culture: {0}", _date.ToShortDateString());

//set back to the original date format
Thread.CurrentThread.CurrentCulture = _currentCulture;
Console.WriteLine("Back to original Culture: {0}", _date.ToShortDateString());

Console.Read();
}
}

Get list of Cultures

If you are not aware of the culture names then you can use the following function to get the complete list of available cultures. You can use CurrentTypes enum that defines the types of culture lists that can be retrieved. The below example gets the list of all the cultures that ship with .NET Framework, including neutral and specific cultures, cultures installed in Windows OS and custom cultures created by the user.


static void GetAllCultures()
{
string specificCultureName = "";
CultureInfo[] arrCultureInfo = CultureInfo.GetCultures(CultureTypes.AllCultures);

foreach (CultureInfo ci in arrCultureInfo)
{
try
{
specificCultureName = CultureInfo.CreateSpecificCulture(ci.Name).Name;
}
catch { }

Console.WriteLine(ci.Name + ": " + specificCultureName + ": " + ci.EnglishName);
specificCultureName = "----";
}
Console.Read();
}

WCF for beginners

Posted by Techie Cocktail | 3:18 PM | | 0 comments »

This screencast shows how to build your first WCF service using Visual Studio 2008.


Aaron Skonnard has nicely demonstrated the implementation of WCF service followed by testing and hosting the service.

News - 07.20.2009

Posted by Techie Cocktail | 8:50 PM | | 0 comments »

Users please bear with us as we are in process of updating the design. You may see some breaks in the site for a day or two.

Sorry for the inconvenience caused due to this.

News - 07.18.2009

Posted by Techie Cocktail | 10:14 AM | | 0 comments »

We are planning to go for a new template design, as we are experiencing some limitation with this design. Our focus is to use a design that makes it easy for our users to browse across different articles & sections.

We would also like to take this opportunity to get the feedback from you on how we are doing. Please write us in at techiecocktail@yahoo.com.

Please feel free to also let us know what else you would like to see in our site, what other topics you would like us to write and any other comments.

We would also like to invite people to help us by writing articles for our site or help us in any ways. Our focus is to provide useful technical content, that gives complete information to our users on any technology, tools, tips-n-tricks, resources or any new upcoming technical news articles from any domain like telecommunication, software, finance, real-estate.

If you would like to help us, please mail us your information with email address and/or contact number. We will reach you for more details. After we have received 5 useful and complete articles from you, we will send you a $10 (USA Dollars) worth gift card of your choice for your participation.

Some of the useful Run Commands shortcuts for Windows for some of the common tasks that we perform everyday. These are very useful if you get used to them as it saves lot of navigational time.

Let us know if you know about any other shortcuts and we will add them to this list.

appwiz.cpl:
Add/Remove Programs Wizard.

control:
Access Control Panel

cmd:
Open the Command Prompt Window.

calc:
Calculator

compmgmt.msc:
Open the Computer Management Window.

dcomcnfg:
Open Component Services Window.

certmgr.msc:
Open the Certificate Manager Window.

mstsc:
Open the Remote Desktop session window.

desk.cpl:
View systems display properties.

eventvwr:
Opens the Event Viewer window

regedit:
Opens the registry.

fonts:
Opens up the fonts folder in the Windows Explorer window displaying the
available fonts.

inetcpl.cpl:
Opens the internet properties windows.

control keyboard:
Opens the keyboard properties window.

main.cpl:
Opens the mouse properties window.

osk:
Opens the onscreen keyboard. This could be very useful if you keyboard is not
connected to your system.

control printers:
Opens the printers folder in the control panel.

control admintools:
Opens the Administrative Tools folder in the control panel.

control folders:
Opens the Folder Options window.

control color:
Opens the Appearance Property dialog window.

control schedtasks:
Opens the scheduled task in the control panel.

perfmon:
Opens the performance counters window.

cleanmgr:
Opens the disk cleanup utility.

devmgmt.msc:
Opens the Device Manager window.

dxdiag:
Opens the DirectX Diagnostic Tool.

hdwwiz.cpl:
Add New Hardware Wizard.

gpedit.msc:
Opens the Local Group Policy Editor window.

lusrmgr.msc:
Opens the Local Users & Groups window.

ncpa.cpl:
Opens the Network Connections in the control panel.

firewall.cpl:
Opens the Firewall Settings window.

sqlwb:
Opens the SQL Server.

services.msc:
Opens the Services window.

winword:
Opens the MS word application.

excel:
Opens the excel application.

notepad:
Opens the notepad application.

mspaint:
Opens the MS Paint application.

wordpad:
Opens Wordpad application.

powerpnt:
Opens Microsoft Powerpoint application.

explorer:
Opens Windows Explorer.

iexplore:
Opens Internet Explorer Browser.

inetmgr:
Open Internet information services window.

wab:
Opens the windows address book showing contact files for each user.

ASP.Net is a stateless connection. The pages gets recreated every time the page is posted back to the server. In order to maintain the changes done by the user, asp.net has different state management techniques.

ASP.Net supports Client-side and Server-side State Management options as listed below. In this article we will see client-side management techniques.

Client-side State Management

In this approach, the state information is stored on the client's computer/browser in the form of a URL, Cookies or as Hidden Fields in the webpage. Client side approach is scalable as it stores data on multiple servers i.e. each users information on their own system. There is no need for the server to remember their individual preferences. But on the other hand, client-side approach can create performance bottle necks if large data is stored, as the data would travel between client and server during postbacks.

Lets see these techniques in details with examples.

a. QueryString: With this option, you can pass values from one page to another as query strings, appended to the end of the page's url. Use this option if you are not passing any important values like email id, or any other parameter value as it is visible to the user.

Building a QueryString
The values in the query string passed as key/value pairs seperated by an '&' (ampersand). You can use Server.Transfer or Response.Write method to redirect to the other page by concatenating the parameters as below.


http://www.test.com/test.aspx?day=14&month=07&year=2010


Getting values from the querystring
Below example shows how to get the day, month & year values from the querystring. You can get the querystring value by passing in the name of the querystring or by index to the Request.QueryString object.

Request.QueryString["day"] or Request.QueryString[0]
Request.QueryString["month"] or Request.QueryString[1]
Request.QueryString["year"] or Request.QueryString[2]


b. Cookies: Cookies store the information on the users system. Information like login information, user preferences are generally stored in cookies. Cookies can be accessed across multiple pages. This option is not used to store large values as the information travels back and forth between client & server.

Store the cookies values in Form1.aspx and redirect to Form2.aspx

Response.Cookies["firstname"].Value = "John";
Response.Cookies["lastname"].Value = "Deller";

Server.Transfer("~/form2.aspx");


Retrive cookies value in Form2.aspx page using a label control

lblFinal.Text = Request.Cookies["firstname"].Value + " " + Request.Cookies["lastname"].Value;


c. Hidden Fields: Hidden Fields are stored at the client's side, as HTML on the web page but they are not visible to the user in the page's output on the browser.

It can be viewed by the user by opening the page source hence not used to store important data. As hidden fields also travels back and forth on each requests, it is recommended not to store large data in the hidden fields to avoid performance issues. It can be used to store data related to the user & their preferences.

Store values in hidden field
Insert a placeholder tag which will be replaced by the one that you pass using the code as below:

Aspx page:
<asp:PlaceHolder ID="plHolder" runat="server"></asp:PlaceHolder>

Code:

HtmlInputHidden _htmlInputHidden = new HtmlInputHidden();
_htmlInputHidden.ID = "promotion";
_htmlInputHidden.Value = "50% discount on men's wear";

plHolder.Controls.Add(_htmlInputHidden);


Retrieving the value from hidden field

String strHiddenValue = ((HtmlInputHidden)plHolder.FindControl("promotion")).Value;


d. View State: View State are also stored as HTML on the web page, similar to hidden fields. The data stored in the view state is specific to that page, it cannot be passed to the other pages.

Data can be retained in the view state in between post backs. Most of the server controls in asp.net use view state to retain the data entered by the user during post backs. Custom values can be stored in the view state object.

Again, as this is passed between client and server during post backs, store small amount of data to avoid performance bottlenecks.

Storing value in view state: ViewState["test"] = "This is a test string";

Retrieving value from view state: String strViewState = ViewState["test"];

e. Control State: Control state is like View State but reserved for the custom control you develop. So if you are building your own custom control, its better to use Control State so the users using your control do not break your control by disabling View State.

Refer: http://www.pluralsight.com/community/blogs/fritz/archive/2004/07/01/472.aspx for more details & example.

References
http://msdn.microsoft.com/en-us/library/75x4ha6s.aspx

Generate random numbers

Posted by Techie Cocktail | 12:05 PM | , | 0 comments »

.Net provides an object called 'Random' to generate random numbers. It is contained in System namespace.

Using the Random object we can generate random integers, bytes and doubles. The Random object contains 3 methods called Next, NextBytes and NextDouble for this purpose. To use the object create an instance of the Random class and call its methods.


Random ranGen = new Random();


Methods

a. Next:
Takes an integer number as the maximum number and returns a random non-negative number less than the maximum number supplied.

int number = ranGen.Next(10);

b. NextBytes:
Takes the buffer of byte[] and fills the buffer elements with random byte numbers.

byte[] buffer = new byte[10];
ranGen.NextBytes(buffer);

foreach (byte bte in buffer)
{
Console.WriteLine(bte.ToString());
}


c. NextDouble:
Returns a random double between 0.0 and 1.0 value.

double number = ranGen.NextDouble();

Intellisense support for XML and Javascript

Posted by Techie Cocktail | 9:57 PM | , | 0 comments »

Visual Studio 2008 has new set of supported tools and resources to offer. One of it is intellisense support which is really useful to have at the time of writing the code. It helps developers with a quick in time reference support to the available members & methods within the objects thereby saving a lot of time.

This article is intended to create an awareness of these available tools and resources in Visual Studio 2008. Rest assured, it is very easy to find help of these resources on the internet. Just bing it.

a. XML Intellisense:
XML intellisense support is really useful to the developers as it provides the elements or the child elements details for a node selected. This prevents them to remember or refer to the xml structure in between coding.

The tool support provided by microsoft is 'XML to Schema interface Wizard'. It is very easy to use. Just download and install the tool from microsoft site.

It creates a new template in VS 2008 called 'XML to Schema'. Select your xml document whose schema you want to create. Boom. You will see the XSD file created in your project and also while coding, intellisense support is provided.

b. Javascript Intellisense:
Javascript intellisense support is another thing that is liked by the developers. Some .net developers find difficult coding in java script as there was not much support about the language methods and classes earlier.

With the help of this, developers now get the javascript intellisense while coding the .aspx page (html) and get the handy information of various available members & methods.

Infact not other than this, VS 2008 also supports javascript debugging. Bing it.

Remove unused using statements

Posted by Techie Cocktail | 12:32 PM | , | 0 comments »

In C#, using statements are used to reference namespaces. We tend leave unused spaces as is many times without bothering if any extra using statements are left out. But we do not need to bother at all now because visual studio 2008 has given us one handy option/tool integrated within the VS IDE in the source code unit.

Right click anywhere in the source code unit -> Organize Usings -> Remove Unused Usings.

This removes the unused usings statements, leaving behind the usings references of only those namespaces whose classes are being used in your code.


As seen in the above figure, you can also sort Usings or Remove and Sort both. This option is available both for windows and web projects.

In the LINQ to SQL Overview, we saw the internals of LINQ to SQL with a simple example showing how to retrieve data from SQL. In this article we will see how to insert and delete records in a SQL table using LINQ to SQL.

Lets take the same example as in the Overview article and insert to and delete records from the Countries table.

Insert Records

To insert records to the table, the LINQ provides two methods -
InsertOnSubmit() - Used insert single record to the database.
InsertAllOnSubmit() - Used to insert multiple records to the database.

These inserts are actually commited to the database when SubmitChanges() method of the DataContext is called. Lets insert Australia, Germany & Russia to the Countries table.

Note: The insert, delete and update operations won't work if the table does not have a primary key set.


public static void InsertCountries()
{
//Create the Countries DataContext object.
CountriesDataContext _countriesDataContext = new CountriesDataContext();

//Create the List of type Country.
//This list would contain the new countries that we will insert in the database.
List lstCountry = new List();

//New country objects
Country _1stCountry = new Country();
_1stCountry.CountryId = 7;
_1stCountry.CountryName = "Russia";
lstCountry.Add(_1stCountry);

Country _2ndCountry = new Country();
_2ndCountry.CountryId = 8;
_2ndCountry.CountryName = "Germany";
lstCountry.Add(_2ndCountry);

Country _3rdCountry = new Country();
_3rdCountry.CountryId = 9;
_3rdCountry.CountryName = "Australia";
lstCountry.Add(_3rdCountry);

//Use InsertAllOnSubmit method to insert the new country list.
_countriesDataContext.Countries.InsertAllOnSubmit(lstCountry);

//Commit to the database.
_countriesDataContext.SubmitChanges();
}


Delete Records

To delete records, we use DeleteOnSubmit() or DeleteAllOnSubmit() methods followed by SubmitChanges() method of the DataContext.

Lets delete few countries from the Country table. Lets say, we want to delete all the countries with CountryId > 5.


public static void DeleteCountries()
{
CountriesDataContext _countriesDataContext = new CountriesDataContext();

var cntries = from c in _countriesDataContext.Countries
where c.CountryId > 5
select c;

_countriesDataContext.Countries.DeleteAllOnSubmit(cntries);
_countriesDataContext.SubmitChanges();
}


There are many insert, delete or update scenarios that people can encounter. MSDN provides good reference - LINQ to SQL Samples covering most of the scenarios.

XML Documentation in .Net

Posted by Techie Cocktail | 1:09 AM | , | 0 comments »

Introduction

Code documentation is important to be followed as the standard practise. Obviously its not an interesting job to the code developers, for many reasons and also because of laziness issues. It again depends on the importance of documentation. Lets forget these documentation talks. But bottomline, it is really important for future reference purpose. You will believe one day and some of you already believe that.

Most of the devlepers follow the basic comenting. But if you really want to follow the authentic professional method, .net has it all. The line or block of code is generally commented using //(double forward slash - single line), or /* */ (within slash, asterik block - multiple lines).

But if you want to distribute your code or class libraries to your clients, its very helpful if you submit thorough documentation file along with it for reference purpose.

XML comment tags used for documentation

Lets get into the actuals now. If you type /// (3 slashes) in the source code unit, you will see an XML block that gets auto-generated for you. This is the comment block in xml format. The basic comment tags that show up depends upon where you have put the slashes. If it is above the function block, you will see the below segment,

Sample with default tags


/// <summary>
///
/// </summary>
/// <param name="number1"></param>
/// <param name="number2"></param>
/// <returns></returns>
static int addTwoNumbers(int number1, int number2)
{
}

As seen above, we have <summary>, <param>, <returns> tags added automatically. The <summary> tag is used to provide the summary details on what the method does. The <param> tags are included, to write details on the parameters being passed to the method. And the <returns> is included for details on the return type and/or value from the method.

Note, these xml tags must conform the xml rules otherwise you will get warnings and also you final xml documentation file would not contain the errorneous tags until you fix them.

Lets see other commonly used xml tags available for comments as below:

1. <remarks> - Used to provide detailed information about a type or member.
2. <paramref> - Used to create a reference to a parameter.
3. <see cref="" /> - Used to create a reference to any type or a memeber.
4. <exception cref="" /> - Used to create details on exceptions.
5. <c> or <code> - <c> is Used to demonstrate a
small code segment whereas <code> tag is used to demonstrate multi-lines code segment.
6. <example> - used to demonstrate code examples. Usually the <c> and <code> tags are contained withing <example> tag.

Once these tags are in place in the code, follow these 2 steps and C# compiler will generate the XML Documentation file at the specified location.

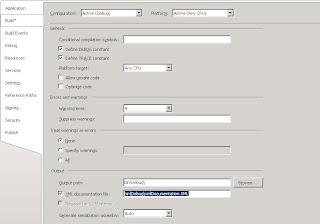
a. Check the XML Documentation file checkbox and specify the file location, in the Build tab of the project's properties.
b. Build the application.


Lets see a complete code source example with some of the comments tags as mentioned above. After the source code is the XML Documentation file generated.

Source Code with XML Comments as Code documentation

using System;
using System.Collections.Generic;
using System.Linq;
using System.Text;

namespace xmlDocumentation
{
class Program
{
/// <summary>
/// This is the entry point method of this project.
/// </summary>
/// <param name="args"></param>
static void Main(string[] args)
{
int number1 = 1;
int number2 = 2;
addTwoNumbers(number1, number2);
}

/// <summary>
///
/// </summary>
/// <param name="number1"></param>
/// <param name="number2"></param>
/// <returns><see cref="int" /></returns>
/// <paramref name="number1">Number 1 is the big number</paramref>
/// <remarks></remarks>
/// <example>
/// <c>Result = number1+number2;</c>
/// </example>
static int addTwoNumbers(int number1, int number2)
{
return number1 + number2;
}
}
}

XMLDocumentation.xml file

<?xml version="1.0"?>
<doc>
<assembly>
<name>xmlDocumentation</name>
</assembly>
<members>
<member name="M:xmlDocumentation.Program.Main(System.String[])">
<summary>
This is the entry point method of this project.
</summary>
<param name="args"></param>
</member>
<member name="M:xmlDocumentation.Program.addTwoNumbers(System.Int32,System.Int32)">
<summary>

</summary>
<param name="number1"></param>
<param name="number2"></param>
<returns><see cref="T:System.Int32"/></returns>
<paramref name="number1">Number 1 is the big number</paramref>
<remarks>This method will add the two numbers being passed as the parameters and returuns the sum of two numbers as the result.</remarks>
<example>
<c>Result = number1+number2;</c>
</example>
</member>
</members>
</doc>

Representation

This article is mainly focussed on getting you familiarized with the available xml tags that can be used to document your code and generate xml documentation file.

Once your xml documentation .xml file is ready, you need to present it in a common man readable format. Some of the available tools that can be used to convert the xml document are stated below. We suggest you to explore them and use based on your liking and requirements.

a. XSL -
You can develop your own XSL stylesheet to decorate the above .xml comment file.

b. NDoc -
This is an extensible code documentation generation tool for .NET Developers. It is completely free to download and use. It converts the .xml file as above and coverts it into .chm file. It is very easy to use. You can find the download link at: http://sourceforge.net/projects/ndoc/

c. Sandcastle -
Sandcastle is provided by Microsoft. It produces accurate, MSDN Style, comprehensive documentation and is also easy to use. This tool is available for download at: http://www.microsoft.com/downloads/details.aspx?FamilyId=E82EA71D-DA89-42EE-A715-696E3A4873B2&displaylang=en

d. DOxygen -
Another souce code documentation generator tool. It is developed under Linux and Mac OS x but highly portable. It supports many output format but the popular one is HTML that is widely accepted. This tool is also easy and available for free at: http://www.stack.nl/~dimitri/doxygen/download.html#latestsrc

These are some of the common available options. There may be other tools available or may come in future.

Hope you start documenting your code after knowing the available easy and neat options to generate professional documentation. Keep patience and have fun.

Introduction

In Sql Server 2005 we have Image datatype to store images. Let's see a simple example on how to store an image to a Sql database table. Then we will see how to retrieve the stored image from the sql table and display it in the Image Server Control using ASP.Net.

This example uses VS 2008 for Asp.Net and Sql Server 2005. Below figure shows the simple web interface with 2 sections. The first section allows user to browse an image file (.jpg) using the FileUpload Server control and then using the button submits/saves the image to the Sql database. The second part allows the user to retrieve & display the latest image from the Sql table to the Image Server Control.

Web Interface

For the simplicity the web interface is kept simple here.


As seen in the above page, there is an alternate text displayed in the image control when it does not refer to any image.

Below is the .aspx page code for reference:


<form id="form1" runat="server">
<div>
<p><b><asp:Literal ID="lit_storeImage" runat="server">Store Image to DB</asp:Literal></b></p>
<asp:Label ID="lbl_SelectFile" runat="server" Text="Select an image file to upload: "></asp:Label>
<asp:FileUpload ID="FileUpload_images" runat="server" />
<br />
<br />
<asp:Button ID="btn_storeImageInDB" runat="server"
onclick="btn_storeImageInDB_Click" Text="Store Image in DB" />
</div>
<hr />
<div>
<p><b><asp:Literal ID="lit_retrieveImage" runat="server">Retrieve Image from DB</asp:Literal></b></p>
<asp:Image ID="imgFromDB" runat="server" AlternateText="No Image"
GenerateEmptyAlternateText="True" Height="80px" Width="80px" />
<br />
<br />
<asp:Button ID="btn_retrieveImageFromDB" runat="server"
onclick="btn_retrieveImageFromDB_Click" Text="Retrieve Image from DB" />
</div>
</form>


Source Code

To store the image to the database, we would need to first convert the .jpeg image to a byte array and then store the record to the database using parameters in the insert statement. If you try to execute a direct insert statement, the .net throws an error as it does not recognizes the byte[] format in the insert statement. Try it!

Below is the source code to first get the image path from the FileUpload control that the user selects, and then read the input stream of the image to a byte[] array. Then store the byte[] into the column of type Image.

Please include the required error handling in the code below.

Source code to store/save image to the Database


private void StoreImageinDB(FileUpload flUpload)
{
SqlConnection _sqlConnection = new SqlConnection();
SqlCommand _sqlCommand = new SqlCommand();

_sqlConnection.ConnectionString = ConfigurationManager.ConnectionStrings["StoreImgConnString"].ConnectionString;

_sqlConnection.Open();

_sqlCommand.Connection = _sqlConnection;

string SQLString = "Insert into ImageStore (imgDescription, type, image) values (@imgDescription, @type, @Image)";
_sqlCommand.CommandText = SQLString;

_sqlCommand.Parameters.AddWithValue("@imgDescription", "Humpback Whale");
_sqlCommand.Parameters.AddWithValue("@type", "jpeg");

//create byte[] of length equal to the inputstream of the selected image.
byte[] imageByte = new byte[flUpload.PostedFile.InputStream.Length + 1];
flUpload.PostedFile.InputStream.Read(imageByte, 0, imageByte.Length);
_sqlCommand.Parameters.AddWithValue("Image", imageByte);

_sqlCommand.ExecuteNonQuery();

_sqlConnection.Close();
}

protected void btn_storeImageInDB_Click(object sender, EventArgs e)
{
FileUpload _fileUpload = (FileUpload)this.FindControl("FileUpload_images");
if (_fileUpload.HasFile)
{
StoreImageinDB(_fileUpload);
}
else
{
Response.Write("Please select an image file");
}
}


As in the code above, the PostedFile.Inputsteam represents the stream of the image selected. And using the Read method, the image stream is read into the byte[].

Source to retrieve image from the Database

The below code shows how to retrieve the image from the database.


protected void btn_retrieveImageFromDB_Click(object sender, EventArgs e)
{
RetrieveImageFromDB();
}

private void RetrieveImageFromDB()
{
imgFromDB.ImageUrl = "ImageURL.aspx";
}


From the database, we retrieve the image in the byte[] array format. But the Image Server Control needs the ImageURL. Hence, as seen in the RetrieveImageFromDB() method, you specify a new .aspx page that would contain the logic to get the image from the database.

Create a new page in the project named ‘ImageURL.aspx’ which would have the below code on page_load() event.

ImageURL.aspx


protected void Page_Load(object sender, EventArgs e)
{
SqlConnection _sqlConnection = new SqlConnection();
SqlCommand _sqlCommand = new SqlCommand();

_sqlConnection.ConnectionString = ConfigurationManager.ConnectionStrings["StoreImgConnString"].ConnectionString;
_sqlConnection.Open();
_sqlCommand.Connection = _sqlConnection;

string SQLString = "select top 1 * from ImageStore";
_sqlCommand.CommandText = SQLString;

SqlDataReader _sqlDataReader = _sqlCommand.ExecuteReader();

//we need to typecast to byte[] before feeding it to BinaryWrite method.
if (_sqlDataReader.Read())
{
Response.BinaryWrite((byte[])_sqlDataReader["Image"]);
}

_sqlDataReader.Close();
_sqlConnection.Close();
}


Here we use Response.BinaryWrite method to write the byte[] array image data to the HTTP output stream. So when this page (ImageURL.aspx) is being referred by the Image control (ImageURL property), the page_load() event fires, and it gets in return the byte[] array image data back to the Image control which displays the image as seen in the page below.


Enjoy Coding!

LINQ to SQL Overview

Posted by Techie Cocktail | 4:49 PM | , | 1 comments »

Introduction

Now what is this new thing? As we all know that every day we have something new coming up. It is the new way to access data from the SQL. LINQ to SQL got introduced in VS 2008, .Net Framework 3.5. Hence update your visual studio to this version before you can work on LINQ to SQL.

First thing before we start, Please forget everything about ADO.Net concepts so that you don't try to relate any of its concepts with LINQ to SQL internals.

Overview

LINQ to SQL uses an Entity-based Framework. It uses a DataContext that contains one or more entity classes. These classes contain public properties that map to each column of the database table that they map to. When we execute LINQ to SQL queries and retrieve data from database, instances of these entity objects get created for each row in that SQL table. You do not have to do all this work, the whole process is internally taken care by the DataContext object.

If you are new to LINQ to SQL, you may not understand some of the above mentioned
terminologies. In short, DataContext is required which helps retrieve data from the
database and also submits our changes back to the data to the database.

Lets see a step-by-step example and relate to what we have read.

Example

a. Lets say we have a Countries table in SQL as below. We will use LINQ to SQL query to retrieve the countryName values from Countries table.


Here we will work on a simple console application mainly to display the data that we retrieve using LINQ to SQL.

b. Add new item to the project called 'LINQ to SQL Classes'. This creates a .dbml file. Select the .dbml file to load the Object Relational Designer (ORD). Drag and drop the Countries table from Server Explorer to the ORD.


As we dropped the Countries table, it creates the Countries DataContext underneath (can be viewed in Countries.designer.cs file). Using the instance of this DataContext object we can read and update data to and from the database.

As we see above, the Country Entity class gets created and it has public properties that map directly to the columns of Countries table. In our code we would use this entity class that stores the data retrieved from SQL table using the CountriesDataContext.

c. Sourcecode:


using System;
using System.Collections.Generic;
using System.Linq;
using System.Text;

namespace linqtosql
{
class Program
{
static void Main(string[] args)
{
GetCountries();
}

Public static void GetCountries()
{
//Create instance of the Countries DataContext class.
CountriesDataContext _countriesDataContext = new CountriesDataContext();

try
{
//Prepare the query to retrieve the data from Countries table
var resCountries = from c in _countriesDataContext.Countries
select c;

//Execute the SQL Query and print the CountryName values

//Also here the CountryDataContext creates
//instances of Country class with data values for each row of data
//in the Countries table.
foreach (var resCountry in resCountries)
{
Console.WriteLine(resCountry.CountryName);
}
Console.Read();
}
catch (Exception ex)
{
Console.Write(ex.Message);
Console.Read();
}
}
}
}


Optional

This is one way of creating DataContext and the Entity Classes. You can also create them on your own, without any tool. Refer http://msdn.microsoft.com/en-us/library/bb386940.aspx for more information about creating manually DataContext & Entity Classes, map them to the database table and query to get the data in the similar way as above.

In the next article we will see some of the common SQL-like operations using LINQ to SQL like how to insert, update, delete, and read using filters, sorting, grouping.

References: http://msdn.microsoft.com/en-us/library/bb386976.aspx

If you are using Windows Vista OS & SQL Server 2005 on your local system and if you are having a hard time to connect to <Machine-name>/SQLEXPRESS SQL Server with error message - "Can't connect to SQL Server", then the culprit is SQL Express 2005 SP1.

Download SQL Express 2005 SP1 from the below site and try reconnecting, you will say c'mon, don't tell me this was the issue :)

http://www.microsoft.com/downloads/details.aspx?FamilyId=11350B1F-8F44-4DB6-B542-4A4B869C2FF1&displaylang=en

Update IIS Settings using Script

Posted by Techie Cocktail | 12:19 AM | , , | 0 comments »

Introduction
Internet Information Services (IIS) is a widely used Internet Services Platform for Microsoft Web Applications. The Web Applications are hosted on IIS by creating websites/virtual directories and/or application pools. Various settings need to be configured before and after the application is deployed on IIS. Some of the important settings are TCP Port, SSL Port, Connection Timeout, IIS log files properties, application pool settings and others.

Most of us configure these settings by going to the IIS Manager (start->Run->inetmgr) which everyone would be already aware of. But there is another approach to update the IIS Settings and that is using an IIS Admin script. The server administrators would know about its usage but for those who are not aware of this approache, you will believe that its quite easy to use it as well.

Lets see the script & related files locations and its usage. In this article, we would see how to read the existing websites, virtual directories (VDs) and app pools (APs) on IIS. Then we will see how to read the values of some their common configuration settings followed by updating the settings. We won't create or delete any websites, VD or APs.

Files and locations
The important files here are:
a. adsutil.vbs: This is THE script to GET or SET configuration settings in IIS.
Located at: C:\Inetpub\AdminScripts\

b. MetaBase.xml: This file stores the current IIS Settings in the XML Format.
Located at C:\%SystemRoot%\System32\Inetsrv\

c. MBSchema.xml: This file contains all the properties with their InternalName and datatypes. The internal names correspond to the property name that you would use to update the value using adsutil.vbs script.
Located at C:\%SystemRoot%\System32\Inetsrv\

These files should be secured and accessible only to administrators because of wrongly updated may break your web applications. But you need not exactly be worried because the backups of both of these XML Files are being maintained for us to rollback any changes which are located at C:\%SystemRoot%\System32\Inetsrv\History.

You can have a quick look at the Metabase files to get familiarized with the common property names and their datatypes that you require to update in IIS.

Let us now look at the usage of adsutil.vbs script and GET/SET some of the common properties.

Using the script
Commands to Analyze Websites, VDs & APs created on your IIS
a. The first thing is to list the instances of the websites, VDs and APs created on your iis. Using the instance name, you can target the settings that you need to read or update.

The below command enumerates the paths (instances) of all the websites, VDs, APs on your webserver. Using these paths, you can target the settings for the ones that you need to update.

c:\Inetpub\Adminscripts>adsutil.vbs enum /P /w3svc

The result will be something like this:

[/w3svc/1]
[/w3svc/1025764322]
[/w3svc/2]
[/w3svc/3]
[/w3svc/AppPools]

where [/w3svc/1], [/w3svc/2], [/w3svc/3] correspond to websites and results like [/w3svc/1025764322] are for VDs.

b. Get the details of a particular website.

c:\Inetpub\Adminscripts>adsutil.vbs enum /w3svc/1

Note: Do not include the /P (path) switch.

In the result, you will see the values of various configuration settings as in your IIS Manager for a website. The website name is determined by the 'ServerComment' property.

c. Get the details of a particular virtual directory.

c:\Inetpub\Adminscripts>adsutil.vbs enum /w3svc/1025764322

d. Read or update the details of specific property values.

Use GET to read and SET to update:

1. Get the ServerComment property value. This corresponds to your website name under Default Website.
c:\Inetpub\Adminscripts>adsutil.vbs GET /w3svc/1/ServerComment

2. Get the ServerBindings property value. This is corresponding to the TCP Port value in the website tab of your website.
c:\Inetpub\Adminscripts>adsutil.vbs GET /w3svc/1/ServerBindings

3. Get the SecureBindings property value. This is corresponding to the SSL Port value in the website tab of your website.
c:\Inetpub\Adminscripts>adsutil.vbs GET /w3svc/1/SecureBindings

4. Disable the Basic Authentication.
c:\Inetpub\Adminscripts>adsutil.vbs SET /w3svc/1/AuthBasic "False"

5. Set the ConnectionTimeout value to 120 seconds.
c:\Inetpub\Adminscripts>adsutil.vbs SET /w3svc/1/ConnectionTimeout 120

e. Get the list of App Pools.

c:\Inetpub\Adminscripts>adsutil.vbs enum /P /w3svc/AppPools

The above command gets the existing App Pools. To read or update the property value of an app pool, use GET or SET commands as shown in section d.

c:\Inetpub\Adminscripts>adsutil.vbs GET /w3svc/AppPools/<AppPoolName>/<InternalName>

The commands are easy to use and also you can get hold of the website, VDs or APs whose settings you need to update using the /P (path) in the command.

The only thing you need to know is the exact InternalName (PropertyName), that you can use in your commands. You can either refer to your Metabase xml file or for a quick check you can also use the below command and search through the appropriate name. Its result will have most of the common property names and their datatypes listed for you.

c:\Inetpub\Adminscripts>adsutil.vbs enum /w3svc

Isn't it easy and straightforward? Hope this makes your life easy and makes you happy too. Have fun!

References
http://www.microsoft.com/technet/prodtechnol/WindowsServer2003/Library/IIS/d3df4bc9-0954-459a-b5e6-7a8bc462960c.mspx?mfr=true

Add/Remove nodes or elements to an XML Document

Posted by Techie Cocktail | 11:12 PM | , | 4 comments »

In the article, Update nodes and attributes in Xml document, we saw how to update an element or an attribute value in an Xml Document. It requires you to have a pointer to the node or attribute to update before you can update its value.

Lets say you want to add a new node section to an existing Xml document. For example lets take the same Xml file as used in the earlier article. It contains list of books, each having its name, author and price values. Say you want to add a new book & its details to the existing list of books.

Xml File: books.xml
<?xml version="1.0"?>
<books>
<book name="asp.net">
<author>John</author>
<price>35</price>
</book>
</books>

To add a new node, you don't require to have any pointer using XPath. XMLDocument, XMLElement and its properties and method does it all. We will first see how to add a new book section. After that we will remove the first one using C#.

Add a new node


static void Main(string[] args)
{
string fileName = @"d:\books.xml";

XmlTextReader _xmlTextReader = new XmlTextReader(fileName);
XmlDocument _xmlDocument = new XmlDocument();
_xmlDocument.Load(_xmlTextReader);

//Note: Close the reader object to release the xml file. Else while saving you will get an error that it is
//being used by another process.
_xmlTextReader.Close();

addNode(fileName, _xmlDocument);
}

static void addNode(string fileName, XmlDocument xmlDoc)
{
XmlElement bookElement = xmlDoc.CreateElement("book");
bookElement.SetAttribute("name", "DotNet Made Easy");

XmlElement authorElement = xmlDoc.CreateElement("author");
authorElement.InnerText = "microsoft";
bookElement.AppendChild(authorElement);

XmlElement priceElement = xmlDoc.CreateElement("price");
priceElement.InnerText = "50";
bookElement.AppendChild(priceElement);

xmlDoc.DocumentElement.AppendChild(bookElement);
xmlDoc.Save(fileName);
}

Your Xml file should have new book added and should look like below.

Xml File: books.xml
<?xml version="1.0"?>
<books>
<book name="asp.net">
<author>John</author>
<price>35</price>
</book>
<book name="DotNet Made Easy">
<author>microsoft</author>
<price>50</price>
</book>
</books>

Remove a node
Now lets remove the book - 'asp.net' from the list. The deleteNode() method below will remove the book node whose name="asp.net". Using XPath query we create a pointer to the node that needs to be removed. As book is the child node of the books (root element), RemoveChild() helps to remove the book (child node) from the books (root element).

static void deleteNode(string fileName, XmlDocument xmlDoc)
{
XmlElement _xmlElement = xmlDoc.DocumentElement;

XmlNode _xmlNode = _xmlElement.SelectSingleNode("book[@name='asp']");
_xmlElement.RemoveChild(_xmlNode);
xmlDoc.Save(fileName);
}


As seen from these examples it has become easy to perform almost every Xml task with the use of XML classes in .Net. Happy Coding!

Update nodes and attributes in a Xml document

Posted by Techie Cocktail | 11:09 PM | , | 5 comments »

Introduction
Xml is widely used in application systems to store and receive data, feeds or for some configuration details. There may be times when you need to update some node or element value or update an attribute value. In this article how you can update node or attributes values in an Xml document.

Approach
To update the value of a node or an attribute, you need to first create a pointer or a reference to that node containing the element or attribute that requires an update using XPath query. And once you get the pointer to that node, you can access the node or the attribute and set its value to the new value.

Example
Lets take a sample Xml file and try to update one of the elements and attributes value using C#.

Xml file: books.xml
<?xml version="1.0"?>
<books>
<book name="asp.net">
<author>John</author>
<price>40</price>
</book>
</books>

Lets see how to update an element and an attribute value as in the below sections. In C# the XML Classes can be found in System.Xml namespace.

Updating an element's value
Lets say you need to update the price of the book named asp.net, as in the above Xml document, to a promotional rate from 40 to 35. The below example shows it.


static void Main(string[] args)
{
string fileName = @"d:\books.xml";

//read the Xml file
XmlTextReader _xmlTextReader = new XmlTextReader(fileName);

//load the Xml file into the XmlDocument object
XmlDocument _xmlDocument = new XmlDocument();
_xmlDocument.Load(_xmlTextReader);

//Note: Close the reader object to release the xml file. Else while saving you will get an error that it is
//being used by another process.
_xmlTextReader.Close();

//update the element (price of the book - asp.net)
updateElement(fileName, _xmlDocument);
}

static void updateElement(string fileName, XmlDocument xmlDoc)
{
//get the root element of the document
XmlElement rootElement = xmlDoc.DocumentElement;

//create a pointer/reference to the price node for the book named 'asp.net'
XmlNode priceNode = rootElement.SelectSingleNode("/books/book[@name='asp.net']/price");
priceNode.InnerText = "35";

//save the Xml
xmlDoc.Save(fileName);
}

In the above example, as in the UpdateElement() method, first the pointer is created to the price node of the book named 'asp.net'. Using that pointer its value is updated by accessing its InnerText (get/set) property.

Updating an attribute's value
Lets say the book name has been changed from 'asp.net' to 'Asp.Net Made Easy'. Lets see how to update the name attribute to the new name in the above Xml.

static void Main(string[] args)
{
string fileName = @"d:\books.xml";

//read the Xml file
XmlTextReader _xmlTextReader = new XmlTextReader(fileName);

//load the Xml file into the XmlDocument object
XmlDocument _xmlDocument = new XmlDocument();
_xmlDocument.Load(_xmlTextReader);

//Note: Close the reader object to release the xml file. Else while saving you will get an error that it is
//being used by another process.
_xmlTextReader.Close();

//update the element (book name)
updateAttribute(fileName, _xmlDocument);
}

static void updateAttribute(string fileName, XmlDocument xmlDoc)
{
//get the root element of the document
XmlElement rootElement = xmlDoc.DocumentElement;

//Update the name attribute's value
XmlNode bookNode = rootElement.SelectSingleNode("/books/book[@name='asp.net']");
if (bookNode.Attributes["name"].Value.Equals("asp.net"))
{
bookNode.Attributes["name"].Value = "Asp.Net Made Easy";
}

//save the Xml
xmlDoc.Save(fileName);
}

Validate Xml using Xsd using C#.Net

Posted by Techie Cocktail | 9:54 PM | , | 1 comments »

Say you have an application architecture that reads data from xml file, processes it and further renders or input data to another system. The xml element values should have correct data types, the attributes associated to the elements must have the correct types and should not be empty and so on. There can definitely be inconsistencies in the data.

You must ensure that the xml data that you receive is consistent so as not to break your application or further process invalid data. This article shows how you can validate your xml data source using XSD validation type before further processing it.

The first step is to prepare a schema definition file that sets or define rules for your xml source and based on these rules you can further build your application architecture. This conforms that your application will always receive valid xml data.

Lets see an example,

XML File Source: sites.xml


<?xml version="1.0"?>
<refSites>
<site name="techiecocktail">
<url>http://techiecocktail.blogspot.com</url>
<articles>100</articles>
</site>
<site name="xyz">
<url>http:///xyz.com</url>
<articles>50</articles>
</site>
</refSites>

The schema rules file defined for this xml is as below. You can have your own rules defined as per the requirements.

Schema File: siteSchema.xsd

<xsd:schema xmlns:xsd="http://www.w3.org/2001/XMLSchema" xmlns="generic" elementFormDefault="qualified" targetNamespace="generic">
<xsd:element name="refSites">
<xsd:complexType>
<xsd:sequence maxOccurs="unbounded">
<xsd:element name="site">
<xsd:complexType>
<xsd:sequence>
<xsd:element name="url" type="xsd:string">
</xsd:element>
<xsd:element name="articles" type="xsd:int">
</xsd:element>
</xsd:sequence>
<xsd:attribute name="name" type="xsd:string" />
</xsd:complexType>
</xsd:element>
</xsd:sequence>
</xsd:complexType>
</xsd:element>
</xsd:schema>


Now we have our xml source and its rules defined in the xsd file. Lets use this and build our xml validation logic in c# as below.

XML Valiation:

The required classes that you would require are XMLReaderSettings and XMLReader from System.Xml namespace.

using System;
using System.Collections.Generic;
using System.Text;
using System.IO;
using System.Xml;
using System.Xml.Schema;

namespace ValidateXML
{
class Program
{
static void Main(string[] args)
{
string appDir = System.AppDomain.CurrentDomain.BaseDirectory;

try
{
//Read the xml and xsd files
XmlTextReader _xmlTextReader = new XmlTextReader(appDir + @"..\..\sites.xml");
StreamReader _streamReader = new StreamReader(appDir + @"..\..\siteSchema.xsd");

//create schema object by reading the streamReader required by XMLReaderSettings object
XmlSchema _xmlSchema = new XmlSchema();
_xmlSchema = XmlSchema.Read(_streamReader, new ValidationEventHandler(_xmlReaderSettings_ValidationEventHandler));

//create XMLReaderSettings object and define the validation type
XmlReaderSettings _xmlReaderSettings = new XmlReaderSettings();
_xmlReaderSettings.ValidationType = ValidationType.Schema;
_xmlReaderSettings.Schemas.Add(_xmlSchema);

//define the callback eventhandler that will be called when there are validation errors
_xmlReaderSettings.ValidationEventHandler += new ValidationEventHandler(_xmlReaderSettings_ValidationEventHandler);

//create the XMLReader object by passing the XMLTextReader and XMLReaderSettings objects
//and read the complete xml file and validating it using the defined schema.
XmlReader _xmlReader = XmlReader.Create(_xmlTextReader, _xmlReaderSettings);
while (_xmlReader.Read()) ;

}
catch (Exception ex)
{
Console.WriteLine(ex.Message);
}
}

//Callback EventHandler to display error message occured during validation.
static void _xmlReaderSettings_ValidationEventHandler(object sender, ValidationEventArgs e)
{
Console.Write(e.Message);
Console.Read();
}
}
}

Try to change any data in xml file that does not conform the schema rules. For example, in the xml file, if you change the 'articles' value to a string, the validation EventHandler will be called displaying the error details in the console window.

There are other available validation types such as DTD & XDR, schema validation being the most used one.

Error in Visual Studio:


Follow these steps when you are running your VS program in debug mode,
a. Right click your project name -> go to properties.
b. On the left page, click on Debug Tab.
c. Check the Enable unmanaged code debugging checkbox.
d. Your code should run in debugging mode.

Add Groups and Users to a computer

Posted by Techie Cocktail | 10:58 PM | | 0 comments »

Many of us use 'Computer Management' snap-in to add Groups and users in groups. There is a command line utility available to perform the same task. It really saves time and effort. The utility is called 'net.exe' found in C:\<Windows>\System32 folder.

Commands you can use are as below:

a. Add a group
NET LOCALGROUP <group_name> /add

b. Delete a group
NET LOCALGROUP <group_name> /del

c. Add a user to a group
NET LOCALGROUP <group_name> <user_name | domain\username> /add

d. Delete a user from a group
NET LOCALGROUP <group_name> <user_name | domain\username> /del

This is not just what net.exe can do. Type net.exe /? for help, output as below. The result shows all the available options. To further check the use of these options, type
net.exe <option> /?, NET LOCALGROUP /? syntax as shown in the 2nd screen.

Screen 1


Screen 2


As in this article, we have used LOCALGROUP to add groups and users to the computer. Check out other options as well to see what other wonders it can do to increase your productivity.

Note, To create Groups & Users on a remote computer use PSEXEC.EXE.

Install Certificate on servers using script

Posted by Techie Cocktail | 1:37 PM | | 1 comments »

Have you ever dreamt of installing certificates on more than 200 servers? You will burn yourself if you do it manually on each server and is time consuming as well. Logging on to each server, opening IIS, importing certificate. This process might sound a quick job if you do it on a small bunch of servers but it is really painful if someone gives you a huge set of servers. Also it can become monotonous and you loose your interest.

Here is gift to relieve you from burning. It is called 'IISCertDeploy.vbs' script, which is one of the useful tools available in the 'IIS 6.0 Resource Kit Tools'. This tool is useful to deploy certificates on servers using IIS 6.0.
It is pretty straight-forward to use by just supplying a small bit of information.

The information on the 'IIS 6.0 Resource Kit Tools' can be obtained here. The Tool kit contains other useful IIS related tools that could be very useful to some.

IISCertDeploy.vbs helps perform 3 operations – install, restore and backup certificates. Their usage are as in the below screenshots.

a. Install a Certificate:


b. Backup a Certificate:


c. Restore a Certificate:


d. Switch Options:


Note, in order to execute this script, you must use cscript.exe which can be found at the system folder of the server: c:\windows\system32 typically.

So your install certificate command would look like as below.


cscript.exe IISCertDeploy.vbs -c "<pfx_cert.pfx>" -p <password>


Note: If you are using network or folder path for your certificate or script, don't forget to enclose it within double quotes (""), else the command will not do anything.

Message Queuing - MSMQ

Posted by Techie Cocktail | 9:07 AM | , | 1 comments »

MSMQ is a wonderful, easy and powerful methods by which messages can be stored and retrieved from an independent location. This store is unlike databases or a file server where objects can be sent and received independently. This article explains the basics of installing and configuring MSMQ followed by message send and recieve process using an example. MSMQ is further vast in itself. At the end of this article reference sites are available for more information on MSMQ.

What is MSMQ? How it works?
MSMQ is a message queuing system that enables applications to send and receive messages (objects). It is a seperate independent location where messages are stored and retrieved by applications. The receiving application need not be connected at the time when the sender is storing the messages. Messages can be received at a later time when the sender has finished its processing.

Messages can be an xml document, text, images, or in any other format that the receiving application understands. Message Queues can be private or public. Private queues limit their access to the local computer. Public queues are published is the active directory and can be found and accessed by computers in the network.

Before the applications can use the queues for message exchange, they need to be created first. You can use either create them manually or programmatically.

Lets us first see how to install and configure MSMQ. After we install and configure the queue, we will see how to send and receive messages to and from the queue with a good example.

Configuring Messaging Queue:
1. Go to 'Add or Remove programs' through Control Panel.
2. Click on 'Add/Remove Windows Components'.
3. Search for 'Application Server' & click on Details button.
4. Check mark 'Messaging Queue' and hit OK and follow the wizard till the end.

The location for 'Messaging Queue' may be different on your box, just search for 'Messaging Queue', it must exist somewhere in 'Add/Remove Windows Components' window.


Once it is installed, you should see 'Message Queuing' under 'Services and Applications' in Computer Management snap-in as below.


Creating Queues:
Queues can be created manually or programmatically.

Manual Approach:
1. Open the computer management snap-in.
2. Go to the 'Message Queuing' under the 'Services and Applications'.
3. Right click on the 'Private Queues' -> New -> Private Queue. Enter queue name and hit OK. Your queue gets created.


Programmatic Approach:
.Net provides System.Messaging namespace that contains MSMQ related classes.


MessageQueue msgQueue = MessageQueue.Create(@".\Private$\MyQueue");

Now as we know how to create queues, lets see how to send & retrieve to/from our created queue.

As an example, lets create an XML file. Then create a sender application to read and send the XML file to our queue and a receiving application to read and process the XML file.

XML File:
Lets name this xml file to msg.xml, its content as below.

<?xml version="1.0" encoding="utf-8" ?>
<topic>
<name>MSMQ</name>
</topic>

Sender Application:
This application reads the XML file into XMLDocument object (System.XML namespace), copies the Xml into the message body, serializes it using XmlMessageFormatter, and sends it to the Message Queue.
as message to our queue.

static void Main(string[] args)
{
//Create a private queue
MessageQueue msgQueue = MessageQueue.Create(@".\Private$\MyQueue");

//Loads xml into XMLDocument object
XmlDocument xmlDoc = new XmlDocument();
xmlDoc.Load(@"d:\msg.xml");

//Get the xml into the message body
Message msg = new Message();
msg.Body = xmlDoc;

//serialize the message before sending it to the queue
msg.Formatter = new System.Messaging.XmlMessageFormatter();
msgQueue.Send(msg, "msg1");
}

After executing this code, you will see the msg1 created in the queue as below.


Receiving Application:
As we serialized the message before sending to the queue, at the receiving end the message would need to be deserialized after receiving it and before we could process it further.

static void Main(string[] args)
{
//create & define the message queue
MessageQueue msgQueue = new MessageQueue();
msgQueue.Path = @".\private$\MyQueue";

//Receive the message from the queue.
Message msg = new Message();
msg = msgQueue.Receive();

//define the type of the message being received to deserialize it in the same format as sent
Type[] targettype = new Type[1];
targettype[0] = typeof(XmlDocument);
msg.Formatter = new System.Messaging.XmlMessageFormatter(targettype);

//get the xml message in the XMLDocument object and further process it
XmlDocument xmldoc = new XmlDocument();
xmldoc = (XmlDocument)msg.Body;


Console.Write(xmldoc.InnerXml);
Console.Read();
}

The above example shows how to retrieve a single message. If you want to receive more then one message you can use GetAllMessages() method of the queue and iterate through each message and further process them.

References:
a. MSMQ FAQs: http://www.microsoft.com/windowsserver2003/techinfo/overview/msmqfaq.mspx for more details.
b. MSMQ Complete Reference: http://www.microsoft.com/windowsserver2003/technologies/msmq/default.mspx

Managing EventLogs in Event Viewer using .Net

Posted by Techie Cocktail | 5:58 PM | | 1 comments »

Event Viewer (Start->Run->eventvwr) records the software or application specific, hardware, security events. It maintains log information about issues or errors occured on the system or any application. The information can be quite useful as it gives the date/time and the message and description about the issues which helps debug further.

Logging is one of the most crucial aspect of software programming. One can have custom logging mechanisms for their applications. Eventlog can also be used to log custom logs by defining them in custom application specific EventSources. In this article, we will see how to read/write entries, delete logs, create/delete EventSources. The logs can be written or accessed from a local or a remote machine.

To perform the above operations, we need EventLog class. They can be found in System.Diagnostics namespace.

Examples:
a. Read log entries from Application Log.

While reading LogEntries, you must specify the Log from where you want to read the messages. The example below displays only the messages. We can get complete log details from each entry.


static void Main(string[] args)
{
//Read EventLogEntries
EventLog _evtLog = new EventLog();
_evtLog.Log = "Application";

foreach (EventLogEntry entries in _evtLog.Entries)
{
Console.WriteLine("Entry: " + entries.Message);
Console.Read();
}
}

b. Write event log entries in the EventLog.

While writing Event Log entries, you must specify the EventSource against which your messages are written. Its good to create custom EventSource for your application which distinguishes your messages related to your application. You must also specify the EventLogEntryType (enum) which denotes the type of the message being logged.

static void Main(string[] args)
{
EventLog _evtLog = new EventLog();
try
{
//Check if the source already exists
if (!EventLog.SourceExists("testAppName"))
{
//create event source
EventLog.CreateEventSource("testAppName", "testLogName");
}

//write message
_evtLog.Source = "testAppName";
_evtLog.WriteEntry("testMessage", EventLogEntryType.Information);
}
catch (Exception ex)
{
Console.WriteLine(ex.Message);
Console.Read();
}
}

c. Delete the EventLogSource.

To delete the EventLogSource, you can use EventLog class's DeleteEventSource() static method.

static void Main(string[] args)
{
try
{
//Check if the source already exists
if (!EventLog.SourceExists("testAppName"))
{
//Delete event source
EventLog.DeleteEventSource("testAppName", "."); //deletes 'testAppName' Source from the local machine
}

}
catch (Exception ex)
{
Console.WriteLine(ex.Message);
Console.Read();
}
}

In order to delete specific logs, you can get the list of logs using GetEventLog() method of EventLog class, filter them and delete using the Delete() method.

EventLog.Delete(logName);

Refer MSDN for more details.

Sequential Lists - Queue and Stack

Posted by Techie Cocktail | 11:15 PM | | 0 comments »

Sequential lists are collections of objects that are stored and retrived as lists in a sequential fashion. In .net there are two types of sequential collections called Queue and stack. Both of these are found in system.collections namespace.

Queue
The Queue list is of FIFO (First-in-First-out) type of sequential collection i.e. the object that is stored first in the queue gets retrived first when the queue is dequeued. The items in the queue are added using Enqueue method and are removed using Dequeue method. Count property gets the number of items in the queue.

The below example shows how to add items into the queue.


static void Main(string[] args)
{
int queueCount;

Queue _queue = new Queue();
_queue.Enqueue("obj1");
_queue.Enqueue("obj2");
_queue.Enqueue("obj3");
_queue.Enqueue("obj4");
_queue.Enqueue(null);

queueCount= _queue.Count;
Console.WriteLine(queueCount.ToString()); //count = 6
Console.Read();
}

As you can see in the above example, queue also accepts duplicates and null values.

Now lets see some of the methods and properties on the queue to check its count, access and remove them as in the following example.

static void Main(string[] args)
{

Queue _queue = new Queue();

//Add items to the queue
_queue.Enqueue("obj1");
_queue.Enqueue("obj2");
_queue.Enqueue("obj3");
_queue.Enqueue("obj4");
_queue.Enqueue(null);

//Displays the queue count.
Console.WriteLine(_queue.Count.ToString()); //6

//Removes the first element from the queue.
Console.WriteLine(_queue.Dequeue()); //removes obj1

//displays the top most queue element but does not removes it from the queue.
Console.WriteLine(_queue.Peek()); //displays obj2

//count check after dequeue and peek.
Console.WriteLine(_queue.Count.ToString()); //5

Console.Read();
}

Stack
The stack class is LIFO (Last-in-First-Out) type of sequential list collection. It means that the object that is stored last is retrived first during retrieval operation. To add the item to the stack, it uses push() method and to retrieve items it uses pop() method.

Stack also uses count property and peek() method as in Queue and has similar uses.

Lets see an example to add and retrieve objects in Stack as in the below example.

static void Main(string[] args)
{

Stack _stack = new Stack();

//Add items to the queue
_stack.Push("obj1");
_stack.Push("obj2");
_stack.Push("obj3");
_stack.Push("obj4");
_stack.Push(null);

//Displays the queue count.
Console.WriteLine(_stack.Count.ToString()); //6

//Removes the first element from the queue.
Console.WriteLine(_stack.Pop()); //removes null
Console.WriteLine(_stack.Pop()); //removes obj4

//displays the top most queue element but does not removes it from the queue.
Console.WriteLine(_stack.Peek()); //views obj4

//count check after dequeue and peek.
Console.WriteLine(_stack.Count.ToString()); //4

Console.Read();
}

As we can see from the above examples, both Queue and Stack accepts duplicates and null values. You can perform validations checks while inserting items into these collections as required. Also, the items can be accessed only in sequential fashion, they dont have indexers in order to access items in the middle of the list as we do when using arrays or other collections.

Abstract Class vs Interface

Posted by Techie Cocktail | 8:54 AM | | 0 comments »

This has always been a favorite topic in the interviews. Checkout some of their differences.


Abstract

a. An abstract class cannot be instantiated. To use the abstract class methods it needs to be derived and used.

b. Unlike interfaces, abstract class can contain constructors or destructors, fields, define or implement methods, properties.

c. Abstract class dont support multiple inheritance.

d. Abstract class supports public, private, internal access specifiers.

e. Abstract class are faster in performance compared to interfaces.


Lets see an example of abstract class implementation:


using System;

using System.Collections.Generic;

using System.Linq;

using System.Text;


namespace ConsoleApplication3

{

class Program

{

public abstract class vehicle

{

public abstract void design();

public virtual void speed()

{

Console.WriteLine("Test the speed of the car");

}

}


public class sedan : vehicle

{

//Note if the design() class is not implemented here then you get an error.

public override void design()

{

Console.WriteLine("4 door design model");

}

}


static void Main(string[] args)

{

sedan _sedan = new sedan();

_sedan.speed();

_sedan.design();

Console.Read();

}

}

}


In the above example, vehicle class is an abstract class. It is defined using abstract keyword. It has two methods - design() & speed(). The design() method is abstract and is generic in nature. It imposes on the derived class to implement the design() method as per its purpose in the sedan class or any other derived class. The speed() method has the default implementation in the vehicle class and is virtual in nature. This means that the derived class can either inherit the speed() method as is in its base class or can override the speed method to update its implementation.


Interface

a. An interface on the otherhand can contain only abstract members. It cannot have method implementation, just the method definitions. The class that implements the interface must implement all the methods defined in that interface.

b. The interface cannot contain constructors or destructors, fields, or properties. And by default all the method definitions are public in nature.

c. The class can implement one or more interfaces thereby supports multiple inheritance.

d. Interface does not support any access modifiers like public, private.

e. Interface are comparitively slower in performance. It takes more time to find the corresponding class containing the requested method.


Lets see an interface example,


public interface IVehicle

{

void design();

void speed();

}


public class coupe : IVehicle

{

public void design()

{

Console.WriteLine("2 door design model");

}


public void speed()

{

Console.WriteLine("Test the speed of the car");

}

}


In the above example, IVehicle is the interface. The method definitions are by default public in nature and the class that implements this interface should declare the methods as public. Here the coupe class implements the methods that are mandated by the interface to use them in the class that implements it.


If you want to decide to choose between using an interface or an abstract class, refer MSDN for recommendations.